Of all the conditions you will encounter in property preservation, mold is the one that creates the most confusion among vendors. Not because the field work is complicated. Experienced vendors know how to handle mold. The confusion is around the rules. When do you remediate within allowables? When does it require a bid? When does it cross into surchargeable territory? And what exactly does your documentation need to show?
After thirteen years in this industry, I have seen mold-related work orders mishandled more often than almost any other service type. Not because vendors did bad work, but because they did not fully understand the specific requirements around documentation, cause identification, and bid submission that mold work demands.
This guide covers everything you need to know to process mold work orders correctly from start to finish.
Why Mold Is Different From Other Conditions
Most property damage conditions in preservation are straightforward to categorize. A broken window needs boarding. An overgrown lawn needs cutting. An unsecured door needs a lock change.
Mold is different because of one specific rule that sits at the core of how HUD handles it.
Under HUD FHA guidelines, if a property has mold resulting from the mortgagee’s failure to protect and preserve the property, the mortgagee must remediate the cause of the mold and complete any other required preservation and protection actions to minimize further mold and water damage prior to conveyance. Failing to do this qualifies as mortgagee neglect and is surchargeable.
Read that carefully. The rule is not just that the mold must be removed. The cause must be remediated first. If you wipe down a moldy wall without addressing the moisture source driving the growth, you have not satisfied the requirement. The mold will return, the condition will escalate, and the liability follows.
This cause-first requirement is what makes mold work orders more complex than most other preservation services. It means your assessment and documentation must identify not just where the mold is, but why it is there.
Step 1: Assess the Mold Condition Before Touching Anything
When you arrive at a property and discover mold, your first job is assessment, not remediation.
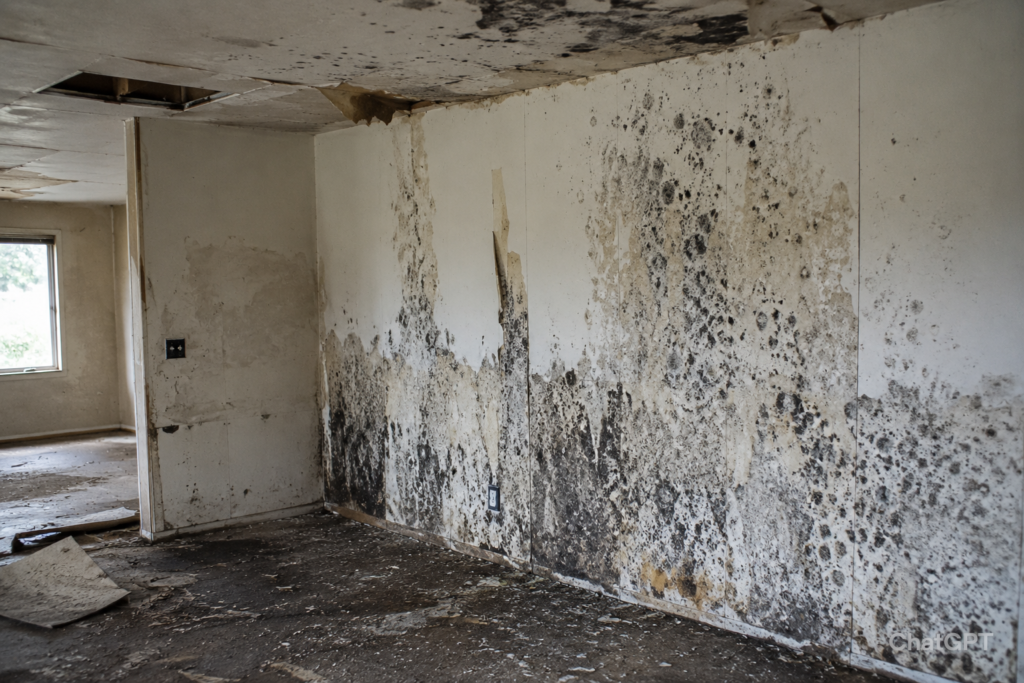
Walk the entire property before you start any work. Mold in one area is often a symptom of a broader moisture issue affecting multiple areas. A patch of mold on a basement wall might connect to a foundation crack letting in groundwater. Mold on a bedroom ceiling likely traces to a roof leak two floors above. Mold under a sink cabinet connects to a slow plumbing leak. Finding all affected areas before you start ensures your documentation is complete and your bid, if one is needed, captures the full scope.
As you walk the property, note the following for every area where mold is present. The location and room. The approximate surface area of visible mold growth. The surface type, which matters because porous materials like drywall and carpet often require removal while non-porous surfaces like tile and metal can be cleaned. The likely moisture source. Whether the moisture source is active or has been resolved.
Do not disturb mold-affected materials during your assessment. Walking through a mold-heavy area without proper containment spreads spores throughout the property and escalates the remediation scope significantly.
Step 2: Understand the EPA Size Threshold
The EPA framework that governs mold remediation scope in residential properties establishes a critical threshold at 10 square feet of contiguous mold-affected material. This threshold is the dividing line between work that can be handled with standard PPE and basic cleaning protocols, and work that requires progressively more rigorous containment, engineering controls, and in some cases licensed professional involvement.
For property preservation purposes, this threshold directly affects how you scope and bid the work.
Mold affecting less than 10 square feet of contiguous surface area is generally considered small-scale and can typically be addressed within the standard allowable using EPA-approved cleaning agents and basic PPE. Document it, address it, and report the moisture source for correction.
Mold affecting between 10 and 100 square feet moves into a category requiring more controlled remediation procedures, including containment of the affected area to prevent cross-contamination. Depending on your client’s guidelines and the investor type, this range may still fall within allowable limits or may require an over-allowable bid. Always check your specific client’s pricing matrix before proceeding.
Mold affecting more than 100 square feet of contiguous surface area is significant contamination that typically requires a full professional remediation scope, licensed contractors in many states, air quality testing, and in some cases post-remediation verification sampling. Work in this category almost always exceeds standard allowables and requires a formal bid process. Some national companies require that you stop work and submit the bid before touching anything when you encounter contamination at this scale.
Step 3: Address the Moisture Source First
I want to spend time on this because it is where the most expensive mistakes happen on mold work orders.
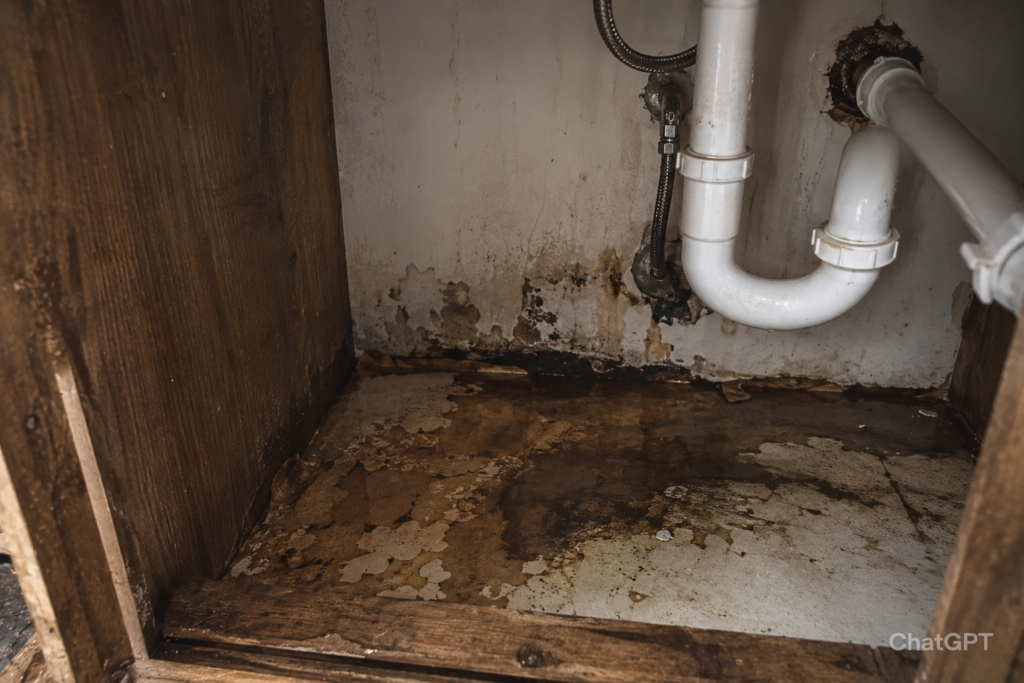
Before you do any mold removal, the moisture source must be identified and corrected. There are no exceptions to this. If you remove mold from a wall without fixing the roof leak above it, the wall will be moldy again within weeks and you will be looking at a chargeback or a liability claim for failing to address the underlying cause.
Common moisture sources in vacant properties include active roof leaks, failed or missing gutters directing water toward the foundation, plumbing leaks from supply lines or drain connections, improper winterization leaving standing water in pipes or fixtures, broken or missing windows allowing weather intrusion, and inadequate ventilation in crawlspaces or basements creating sustained high humidity.
If the moisture source requires work that is within your current work order scope, address it first, then proceed with remediation. If it requires work that is outside your scope or exceeds allowables, document it thoroughly, submit a bid for the moisture source correction alongside your mold remediation bid, and wait for approval before proceeding on either item.
Submitting both bids together matters. A reviewer seeing a mold remediation bid without a corresponding moisture source correction will question whether the remediation will hold, and may delay approval or request additional information. Presenting them together shows that you understand the cause-first requirement and have scoped the work correctly.
Step 4: Know When a Dehumidifier Is Required
One specific requirement that catches vendors off guard is the dehumidifier rule under HUD FHA guidelines.
For properties with mold conditions, HUD requires the installation of a dehumidifier where applicable as part of bringing the property into conveyance condition. The dehumidifier serves as an ongoing moisture control measure after remediation to prevent recurrence.
The EPA supports this approach. Maintaining indoor relative humidity below 60 percent, and ideally between 30 and 50 percent, is the standard recommendation for preventing mold growth. A dehumidifier installation is the primary method for achieving this in a vacant property where there is no active climate control.
When you encounter a mold condition that warrants remediation, assess whether a dehumidifier is appropriate given the moisture levels and ventilation conditions in the property. If it is, include it as a line item in your bid. If the property already has a dehumidifier in place from a prior service, check that it is functioning and document its current status with photos.
One important note: if the property has a sump pump, remember the rule from earlier in this series. Do not turn off electricity to properties with active sump pumps. A functioning dehumidifier also requires an active electrical connection, so always confirm the electricity status at a property before planning your moisture control approach.
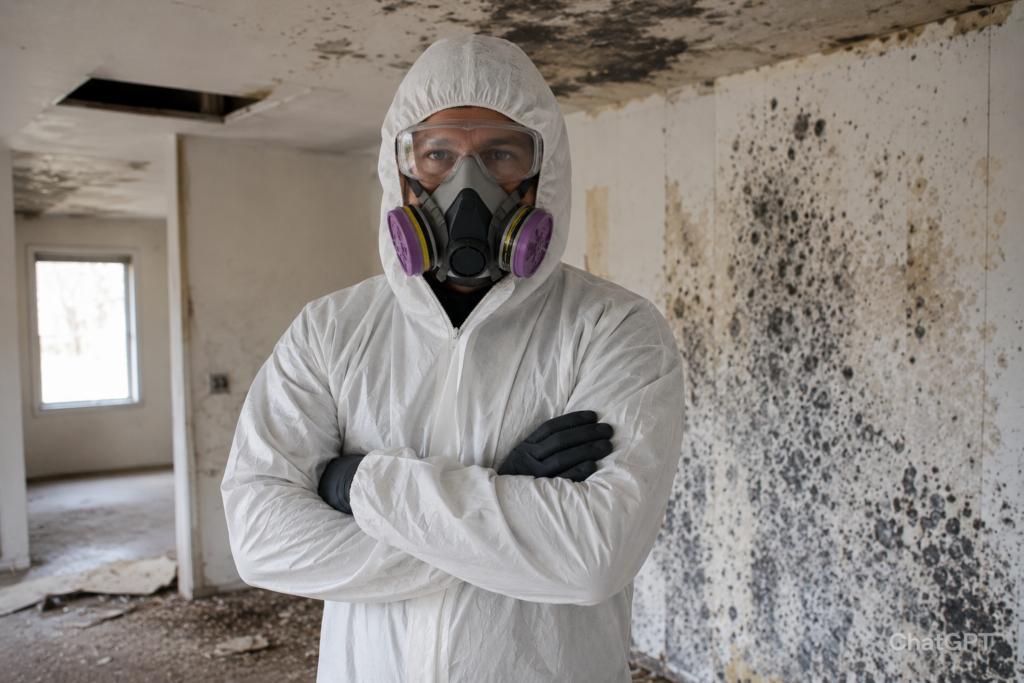
Step 5: Personal Protective Equipment Is Non-Negotiable
I want to be direct about this because it is a health issue, not just a procedural one.
Before working in any area with significant mold growth, you need proper PPE. At minimum, a properly fitted N-95 respirator or better, nitrile or rubber gloves, and safety goggles. For significant mold contamination, a full respirator with P100 filters, disposable coveralls, and boot covers are appropriate.
Mold spores become airborne during any disturbance of affected materials. Inhaling mold spores in significant quantities causes health issues ranging from respiratory irritation to more serious conditions with prolonged exposure. Do not underestimate this. No work order is worth a respiratory health problem.
If the contamination is extensive, establish containment before beginning work. This means sealing off the affected area with plastic sheeting, using a negative air machine or HEPA-filtered fan unit to direct airflow out of the contained area, and minimizing foot traffic through unaffected areas while work is in progress. For large-scale contamination, this level of containment is not optional. It is part of doing the job correctly.
Step 6: Mold Remediation by Surface Type
The method you use for mold removal depends on the surface you are working on. Getting this right is important both for the effectiveness of the remediation and for how you document and bid the work.
Non-porous surfaces such as tile, metal, glass, and hard plastics. Clean with an EPA-approved biocidal cleaning agent, allow to dry thoroughly, and photograph the cleaned surface. These surfaces do not need to be removed unless they are structurally compromised.
Semi-porous surfaces such as wood framing, structural lumber, and concrete. These can often be cleaned using wire brushing, sanding, or HEPA vacuuming followed by application of an antimicrobial agent. Document the treatment method used and the condition of the surface after treatment. If the structural integrity of the wood is compromised, it must be removed and replaced, which requires a bid.
Porous surfaces such as drywall, carpet, insulation, and ceiling tiles. Any porous material with visible mold growth must typically be removed and replaced rather than cleaned, because mold penetrates into the material at a cellular level and cleaning the surface does not eliminate the contamination. Document the affected material type, the square footage requiring removal, and photograph the removal process including the material in disposal bags or the dump trailer. Include replacement materials in your bid if they are within scope.
Step 7: Document Every Phase of the Mold Work
Mold remediation documentation has specific requirements that go beyond standard before-and-after photos.
Your photo set for a mold work order should include the following. Before photos of every affected area clearly showing the visible mold growth, taken before any work begins or any materials are disturbed. Close-up photos showing the surface type and the approximate extent of growth. Photos of the identified moisture source before correction. Photos during the remediation showing your containment setup if applicable, materials being removed, and the cleaning or treatment process. After photos of every treated area from the same angles as your before shots. Photos of the dehumidifier installation if applicable. Photos of all disposal bags or removed materials in your vehicle or dumpster.
Write detailed condition notes alongside your photos. Note the specific rooms affected, the surface types, the approximate square footage of each affected area, the moisture source identified and how it was addressed, the cleaning or removal method used, and any conditions that could not be fully addressed within the current scope or allowable.
These notes serve two purposes. They support your current bid submission and completion, and they create a permanent record that protects you if mold recurs at the property and your prior remediation work is questioned.
Bidding Mold Work: What You Need to Know
Mold remediation bids in property preservation follow the same fundamental principles as other over-allowable bids, but with a few specific rules worth highlighting.
Under HUD FHA guidelines, when mold remediation costs exceed the standard allowable, HUD requires that a minimum of two bids be submitted by two different contractors, and HUD will approve the lowest of the two. This means you cannot be the only bid on a large mold job. If you are the vendor who found and documented the condition, your client needs to source a second competitive bid before the work can be approved.
Understanding this upfront avoids the frustration of submitting a detailed mold remediation bid and waiting for approval, only to be told a second bid is required. When you identify a mold condition that clearly exceeds the standard allowable, note in your initial report that a second bid will be required per HUD guidelines and flag it for your client immediately.
For Fannie Mae properties, the standard over-allowable process applies. Submit your bid through HomeTracker within fifteen calendar days of the date of discovery, with all required supporting documentation. Fannie Mae reserves the right to request additional bids and additional information at any time, and you will have seven calendar days from their response to provide anything requested.
Your bid description for mold work must include the affected areas and their locations, the surface types involved, the approximate square footage of each affected area, the moisture source identified and how it will be corrected, the specific remediation method proposed, any materials requiring removal and replacement with quantities, dehumidifier installation if applicable, and disposal costs. This level of detail is not excessive. It is what a reviewer needs to evaluate whether the scope is justified and the pricing is reasonable.
One Thing That Compounds Quickly at Volume
Here is something worth acknowledging honestly.
A single mold work order at a moderately affected property is manageable. The assessment, the documentation, the moisture source correction, the remediation, the photos, the bid submission, the completion. It is time-consuming but workable.
When you are managing multiple properties with mold conditions simultaneously, the documentation and processing burden compounds fast. Each property needs its own complete photo set, its own condition notes, its own bid with accurate square footage and surface type breakdowns, and its own portal submission with the documentation structured correctly for that specific client. For Fannie Mae properties, the fifteen-day bid submission window is running on every one of them simultaneously.
This is the kind of processing load that falls apart when it is handled alongside field operations without dedicated back-office support. Photos get uploaded to the wrong property. Bid descriptions get abbreviated because there is no time to write them properly. The second bid requirement gets missed on a HUD job and the approval gets delayed for weeks.
At AssetSure Processing, mold work order processing is one of the service types we handle regularly for property preservation vendors. We manage the documentation organization, bid preparation, and portal submissions so that every mold work order goes in with the same level of completeness and accuracy, regardless of how many are in process simultaneously.
If mold season is creating a back-office bottleneck for your operation, that is a straightforward problem to solve.